The experiences, Test cases, views, and opinions etc expressed in this website are my own and does not reflect the views or opinions of my employer. This site is independent of and does not represent Oracle Corporation in any way. Oracle does not officially sponsor, approve, or endorse this site or its content.Product and company names mentioned in this website may be the trademarks of their respective owners.
While Loading the data using MySQL Workbench, you may hit the error unhandled exception list index out of range
There are no clues in the workbench log files, in such cases you can load the Data Using MySQL LOAD DATA Statement . Which will load the data very fast and without errors.
mysql> LOAD DATA LOCAL INFILE "C:/\Patient.csv"
-> INTO TABLE xxhc_patient
-> FIELDS TERMINATED BY ','
-> ENCLOSED BY '"'
-> LINES TERMINATED BY '\n'
-> IGNORE 1 ROWS;
Query OK, 58 rows affected, 232 warnings (0.04 sec)
Records: 58 Deleted: 0 Skipped: 0 Warnings: 232
In case if you get the following errors , run the below commands and re-execute load data statements.
ERROR: Loading local data is disabled - this must be enabled on both the client and server sides
ERROR 2068 (HY000): LOAD DATA LOCAL INFILE file request rejected due to restrictions on access.
mysql> SET GLOBAL local_infile=1;
mysql --local_infile=1 -u<username> -p<Password> DB_NAME
# N is the size of the 2D matrix   N*N
N = 9

# A utility function to print grid
def printing(arr):
    for i in range(N):
        for j in range(N):
            print(arr[i][j], end = " ")
        print()

# Checks whether it will be
# legal to assign num to the
# given row, col
def isSafe(grid, row, col, num):

    # Check if we find the same num
    # in the similar row , we
    # return false
    for x in range(9):
        if grid[row][x] == num:
            return False

    # Check if we find the same num in
    # the similar column , we
    # return false
    for x in range(9):
        if grid[x][col] == num:
            return False

    # Check if we find the same num in
    # the particular 3*3 matrix,
    # we return false
    startRow = row - row % 3
    startCol = col - col % 3
    for i in range(3):
        for j in range(3):
            if grid[i + startRow][j + startCol] == num:
                return False
    return True

# Takes a partially filled-in grid and attempts
# to assign values to all unassigned locations in
# such a way to meet the requirements for
# Sudoku solution (non-duplication across rows,
# columns, and boxes) */
def solveSuduko(grid, row, col):

    # Check if we have reached the 8th
    # row and 9th column (0
    # indexed matrix) , we are
    # returning true to avoid
    # further backtracking
    if (row == N - 1 and col == N):
        return True

    # Check if column value  becomes 9 ,
    # we move to next row and
    # column start from 0
    if col == N:
        row += 1
        col = 0

    # Check if the current position of
    # the grid already contains
    # value >0, we iterate for next column
    if grid[row][col] > 0:
        return solveSuduko(grid, row, col + 1)
    for num in range(1, N + 1, 1):

        # Check if it is safe to place
        # the num (1-9)  in the
        # given row ,col  ->we
        # move to next column
        if isSafe(grid, row, col, num):

            # Assigning the num in
            # the current (row,col)
            # position of the grid
            # and assuming our assined
            # num in the position
            # is correct
            grid[row][col] = num

            # Checking for next possibility with next
            # column
            if solveSuduko(grid, row, col + 1):
                return True

        # Removing the assigned num ,
        # since our assumption
        # was wrong , and we go for
        # next assumption with
        # diff num value
        grid[row][col] = 0
    return False

# Driver Code

# 0 means unassigned cells
grid = [[3, 0, 6, 5, 0, 8, 4, 0, 0],
        [5, 2, 0, 0, 0, 0, 0, 0, 0],
        [0, 8, 7, 0, 0, 0, 0, 3, 1],
        [0, 0, 3, 0, 1, 0, 0, 8, 0],
        [9, 0, 0, 8, 6, 3, 0, 0, 5],
        [0, 5, 0, 0, 9, 0, 6, 0, 0],
        [1, 3, 0, 0, 0, 0, 2, 5, 0],
        [0, 0, 0, 0, 0, 0, 0, 7, 4],
        [0, 0, 5, 2, 0, 6, 3, 0, 0]]

if (solveSuduko(grid, 0, 0)):
    printing(grid)
else:
    print("no solution  exists ")

    # This code is contributed by sudhanshgupta2019a
Swap space in Linux is used when the amount of physical memory (RAM) is full. If the system needs more memory resources and the RAM is full, inactive pages in memory are moved to the swap space.
Swap space can be a dedicated swap partition (recommended), a swap file, or a combination of swap partitions and swap files.
We can Create Swap file and make use of it as described below .
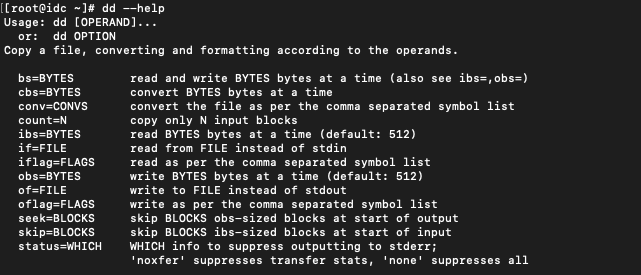
Step 1: Create a file with required size
To create the file we need to use dd command as root user .
I am adding 64G of Swap to my server so the count is 67108864 (1024 * 1024 * 64)
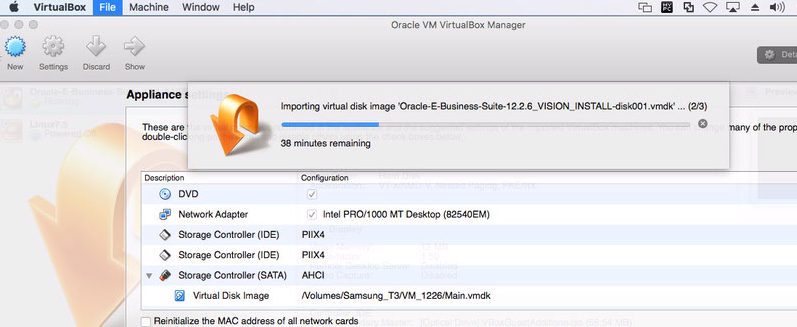
This Post is about How to Create Stage Area To Deploy Oracle VM Virtual Appliance for Oracle E-Business Suite 12.2.6
Step 1:
Download the Oracle E-Business Suite Appliance from Oracle Software Delivery Cloud, Which Contains Below ZIP Files.
V861124-01 Oracle E-Business Suite Release 12.2.6 Single Node Vision Install X86 (64 bit) - (1 of 10) (Part 1 of 2) Linux x86-64V861124-01 Oracle E-Business Suite Release 12.2.6 Single Node Vision Install X86 (64 bit) - (1 of 10) (Part 2 of 2) Linux x86-64V861125-01 Oracle E-Business Suite Release 12.2.6 Single Node Vision Install X86 (64 bit) - (2 of 10) (Part 1 of 2) Linux x86-64V861125-01 Oracle E-Business Suite Release 12.2.6 Single Node Vision Install X86 (64 bit) - (2 of 10) (Part 2 of 2) Linux x86-64V861126-01 Oracle E-Business Suite Release 12.2.6 Single Node Vision Install X86 (64 bit) - (3 of 10) (Part 1 of 2) Linux x86-64V861126-01 Oracle E-Business Suite Release 12.2.6 Single Node Vision Install X86 (64 bit) - (3 of 10) (Part 2 of 2) Linux x86-64V861127-01 Oracle E-Business Suite Release 12.2.6 Single Node Vision Install X86 (64 bit) - (4 of 10) (Part 1 of 2) Linux x86-64V861127-01 Oracle E-Business Suite Release 12.2.6 Single Node Vision Install X86 (64 bit) - (4 of 10) (Part 2 of 2) Linux x86-64V861128-01 Oracle E-Business Suite Release 12.2.6 Single Node Vision Install X86 (64 bit) - (5 of 10) (Part 1 of 2) Linux x86-64V861128-01 Oracle E-Business Suite Release 12.2.6 Single Node Vision Install X86 (64 bit) - (5 of 10) (Part 2 of 2) Linux x86-64V861129-01 Oracle E-Business Suite Release 12.2.6 Single Node Vision Install X86 (64 bit) - (6 of 10) (Part 1 of 2) Linux x86-64V861129-01 Oracle E-Business Suite Release 12.2.6 Single Node Vision Install X86 (64 bit) - (6 of 10) (Part 2 of 2) Linux x86-64V861130-01 Oracle E-Business Suite Release 12.2.6 Single Node Vision Install X86 (64 bit) - (7 of 10) (Part 1 of 2) Linux x86-64V861130-01 Oracle E-Business Suite Release 12.2.6 Single Node Vision Install X86 (64 bit) - (7 of 10) (Part 2 of 2) Linux x86-64V861131-01 Oracle E-Business Suite Release 12.2.6 Single Node Vision Install X86 (64 bit) - (8 of 10) (Part 1 of 2) Linux x86-64V861131-01 Oracle E-Business Suite Release 12.2.6 Single Node Vision Install X86 (64 bit) - (8 of 10) (Part 2 of 2) Linux x86-64V861132-01 Oracle E-Business Suite Release 12.2.6 Single Node Vision Install X86 (64 bit) - (9 of 10) (Part 1 of 2) Linux x86-64V861132-01 Oracle E-Business Suite Release 12.2.6 Single Node Vision Install X86 (64 bit) - (9 of 10) (Part 2 of 2) Linux x86-64V861133-01 Oracle E-Business Suite Release 12.2.6 Single Node Vision Install X86 (64 bit) - (10 of 10) (Part 1 of 1) Linux x86-64
Step 2:
Download assembly.sh (UNIX) or assemble_OSX.sh(for Mac) from Oracle Support Doc ID 2254565.1 Or You can Use UNZIP Tools like 7ZIP.exe. Generate Oracle-E-Business-Suite-12.2.6_VISION_INSTALL.ova.00 to Oracle-E-Business-Suite-12.2.6_VISION_INSTALL.ova.18
Step 3:
UnZip All the OVA part Files to Make it as a Single OVA file. i.e. Oracle-E-Business-Suite-12.2.6_VISION_INSTALL.ova
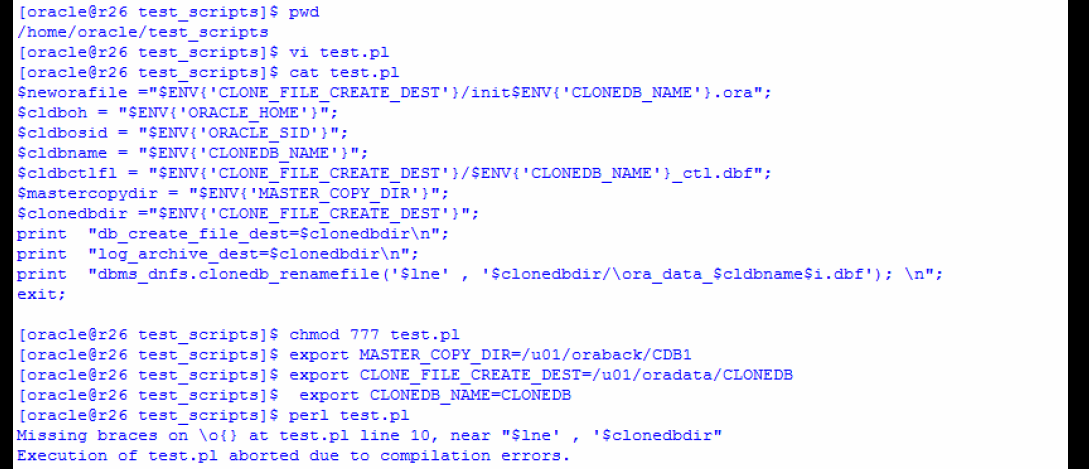
There is a known issue with clonedb.pl script, you might end-up with “Missing braces on \o{} at clonedb.pl line 245, near “$lne’ , ‘$clonedbdir” Especially if you are using perl Vv5.10.1.
Actual Line: print OUTFILE1 “dbms_dnfs.clonedb_renamefile(‘$lne’,’$clonedbdir/\ora_data_$cldbname$i.dbf’); \n”;
You will get the Error when this Line of code executed and “\o” is the root cause in Perl Execution.
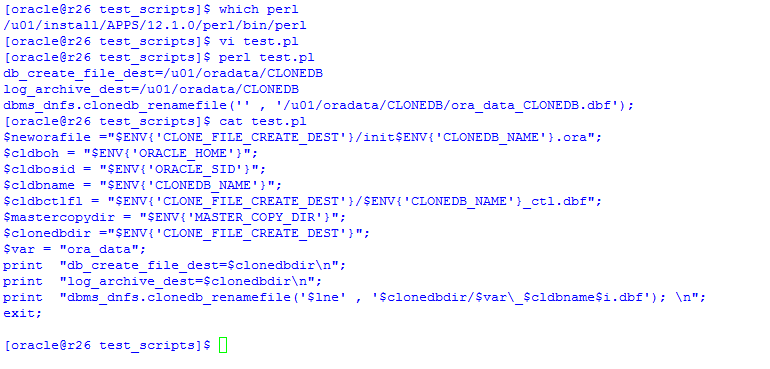
to avoid this, just define a new Variable $var, for Ex, in my case, $var = “ora_data”; and place it in the Script to get the Job Done.
‘$clonedbdir/\ora_data_$cldbname$i.dbf’); to ‘$clonedbdir/$var\_$cldbname$i.dbf’);
Make changes in the Script as needed.
Thank you for giving your valuable time to read the above information. Happy Coding !. 😉
Today, I had an Issue with My Oracle DB V 11.2.0.1 and It was Corrupted due to unexpected power failures More than 10 times 😉 !.
As Its a Test DB, I don`t have regular backups. It was an Internal Error with ORA-00600: internal error code, arguments: [kcratr_nab_less_than_odr] As I don`t have complete backup to recover , I can recover using ICR ( Incomplete recovery)
Thanks for your time , Happy reading & Have a Good day 😉
The grid-based, column-oriented, Vertica Analytics Platform is designed to manage large, fast-growing volumes of data and provide very fast query performance when used for data warehouses and other query-intensive applications. The product claims to drastically improve query performance over traditional relational database systems, provide high-availability, and petabyte scalability on commodity enterprise servers.
Its design features include:
Column-oriented storage organization, which increases performance of sequential record access at the expense of common transactional operations such as single record retrieval, updates, and deletes.[6]
Out-of-place updates and hybrid storage organization, which increase the performance of queries, insertions, and loads, but at the expense of updates and deletes.
Compression, which reduces storage costs and I/O bandwidth. High compression is possible because columns of homogeneous datatype are stored together and because updates to the main store are batched.[7]
Shared nothing architecture, which reduces system contention for shared resources and allows gradual degradation of performance in the face of hardware failure.
Easy to use and maintain through automated data replication, server recovery, query optimization, and storage optimization.
Support for standard programming interfaces ODBC, JDBC, and ADO.NET.
Key Features of the Vertica Analytics Platform
Real-Time Query & Loading »Capture the time value of data by continuously loading information, while simultaneously allowing immediate access for rich analytics.
Advanced In-Database Analytics »Ever growing library of features and functions to explore and process more data closer to the CPU cores without the need to extract.
Database Designer & Administration Tools »Powerful setup, tuning and control with minimal administration effort. Can make continual improvements while the system remains online.
Columnar Storage & Execution »Perform queries 50x-1000x faster by eliminating costly disk I/O without the hassle and overhead of indexes and materialized views.
Aggressive Data Compression »Accomplish more with less CAPX, while delivering superior performance with our engine that operates on compressed data.
Scale-Out MPP Architecture »Vertica automatically scales linearly and limitlessly by just adding industry-standard x86 servers to the grid. . . . .
Automatic High Availability »Runs non-stop with automatic redundancy, failover and recovery optimized to deliver superior query performance as well. . . . .
[root@sriram ~]# rpm – iv /media/20131105_1301/vertica-6.1.3-0.x86_64.RHEL5.rpm
Preparing packages for installation…
vertica-6.1.3-0
Vertica Analytic Database V6.1.3-0 successfully installed on host sriram.localdomain
———————————————————————————-
Important Information
———————————————————————————-
If you are upgrading from a previous version, you must backup your database before
continuing with this install. After restarting your database, you will be unable
to revert to a previous version of the software.
———————————————————————————-
To download the latest Vertica documentation in zip or tar format please visit the
myvertica web site.
To complete installation and configuration of the cluster,
run: /opt/vertica/sbin/install_vertica
Vertica Analytic Database 6.1.3-0 Installation Tool
Upgrading admintools meta data format..
scanning /opt/vertica/config/users
WARNING: No hostname list provided. Installing to localhost
Starting installation tasks…
Getting system information for cluster (this may take a while)….
backing up admintools.conf on 127.0.0.1
Default shell on nodes:
127.0.0.1 /bin/bash
Checking/fixing OS parameters…..
Setting vm.min_free_kbytes to 51200 …
Info! The maximum number of open file descriptors is less than 65536
Setting open filehandle limit to 65536 …
Info! The session setting of pam_limits.so is not set in /etc/pam.d/su
Setting session of pam_limits.so in /etc/pam.d/su …
Info! Parameter vm.max_map_count is less than 253086
Setting vm.max_map_count to 253086 …
Detected cpufreq module loaded on 127.0.0.1
CPU frequency scaling is enabled. This may adversely affect the performance of your database.
Vertica recommends that cpu frequency scaling be turned off or set to ‘performance’
Creating/Checking Vertica DBA group
Creating/Checking Vertica DBA user
Password for dbadmin:
Installing/Repairing SSH keys for dbadmin
Creating Vertica Data Directory…
Updating spread configuration…
Verifying spread configuration on whole cluster.
Creating node node0001 definition for host 127.0.0.1
… Done
Error Monitor 0 errors 2 warnings
Installation completed with warnings.
Installation complete.
To create a database:
1. Logout and login as dbadmin.**
2. Run /opt/vertica/bin/adminTools as dbadmin
3. Select Create Database from the Configuration Menu
** The installation modified the group privileges for dbadmin.
If you used sudo to install vertica as dbadmin, you will
need to logout and login again before the privileges are applied.
[root@sriram ~]#
To create a database:
1. Logout and login as dbadmin.**
2. Run /opt/vertica/bin/adminTools as dbadmin
3. Select Create Database from the Configuration Menu
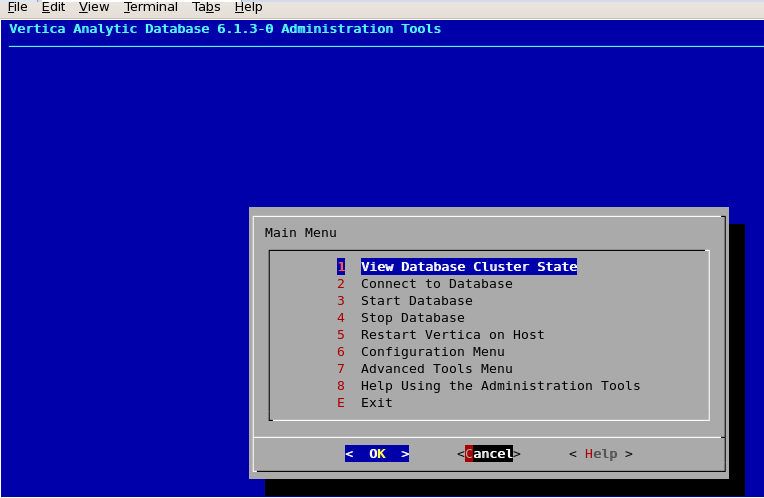
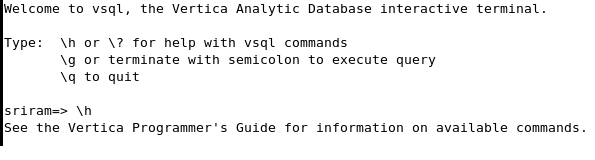
Now login as dbadmin and accept the license agreement ! Once after that now a window will appear, using which you can create & configure Vertica DB.
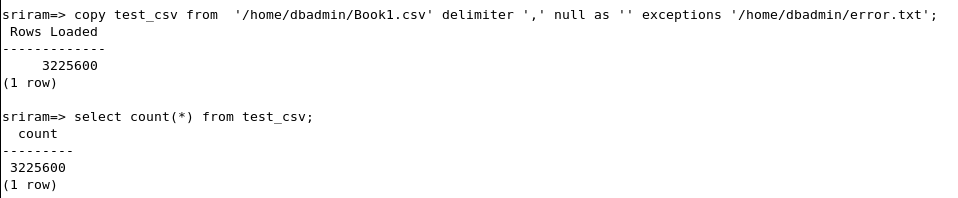
After Database creation you can see the below Interactive window for Regular operations !